We may earn money or products from the companies mentioned in this post.
Introduction
Hunting can be fun. But carrying your prey and working on it can be brutal. If you don't have a deer hanger, this is especially true.
But, how to build a deer hanger?
You will need a steel cable, locking pliers. Gambrel, cable clamps, s-hooks, and an electric or hand winch. After ensuring these materials, you need to first make a loop in the cable. After that, wind the cable and then hang it. Lastly, place the deer in your preferred position.
But of course, there are more details that you need to follow. This is why we noted down a detailed guideline for you to build a deer hanger for yourself.
So if you want to have this striking deer hanger this hunting season, keep on reading.
Let’s get started.
Step-by-Step Guide to Building A Deer Hanger

Every prey you hunt is special. Thus it makes sense to use the best arrows for hunting when you find your prey. So you should give just as much effort into preparing it. You'll need a stable deer hanger to accomplish this.
We tell you how to make one of your own, down below. Check it out-
Required Materials
To build your own deer hanger, you will be needing some materials. The required materials are;
- Steel cable
- Locking pliers
- Gambrel
- Cable clamps
- S-hooks
- Electric or hand winch
Make sure to get yourself these materials before starting your project. Your electric and hand winch can hold around 600-700lbs, so you can hoist your deer accordingly.
Step 1: Ensure Cable Specifications
The cable that you will buy for this project needs to meet certain specifications. Check the parameters of the cable used by your winch. You'll be hoisting the deer over a limb of a nearby tree.
So you'll need at least 25 feet of cable. A common hand winch with a 5/32-diameter steel cable can lift about 1/2 ton. This should be sufficient to draw your deer over a branch.
Step 2: Make A Loop Using The Cable
Firstly, make a tiny loop in the cable at one end. Wrap a cable clamp around the cable's end and the loop's starting.
Using the pliers, tighten the clamp. Because the clamp will be tugging the ropes, it should be in the middle. To mark the area, use a scale and a pencil for precision. Making the right cut and measurements is an essential skill for hoisting a deer.
Step 3: Wind The Cable
After that, wind the cable securely on the winch to maintain consistent tension. Winch cables are pre-attached and wound. Nonetheless, it is critical to rewind the cable carefully after each usage. It will minimize slack in the line, which can yank the deer off the gambrel.
This kind of problem is just as important as the issues you face with your ravin r9. So make sure that you keep this factor in mind.
Step 4: Hang The Cable
To hoist the deer, suspend the cable from a high tree limb. The tree limb should be high enough to hang the deer from it. You can also use other bar-like structures in the field. Once the cable has been hung over the branch, attach your gambrel to the end of it. Secure the gambrel to the cable with an S-hook.
A gambrel is a device with a central spreader bar that is triangular in shape. It also has two hooks or prongs on either end for attaching a deer's legs. The gambrel's upper bars are commonly made of flexible strapping, cable, or solid bars with a point for hanging.
Here are some gambrel options that you can try:
| Product 1 | |
| Product 2 |
With these gambrels, you can pull your prey easily and hassle-free.
Step 5: Place The Deer
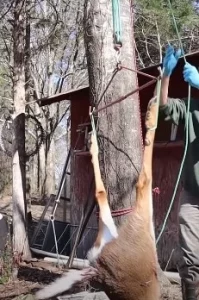
Attach the deer to the gambrel. Then use an electric or hand winch to raise it by cranking it. Raise the deer to a comfortable height before working on the field dressing. You can change the height to fit your demands and comfort level.
That’s it! You can now hang your deer to your new deer hanger. All you need to do now is to prepare it. So use an effective fawn distress call to lure in prey. Hunt it and get started with the prep.
To build a deer hanger, you must follow all of the steps sequentially. So, what’s holding you back? Get the tools you'll need and get to work on one.
FAQs
Question: How tall should a deer skinning rack be?
Answer: Ideally 12ft should be the perfect height for a deer skinning rack. But you can try to make it as long as you can. That way, you'll never have to deal with any huge bucks or hogs.
Question: Can I hang a deer in my garage?
Answer: In your shed, garage, or barn, you can hang a full deer or quarters. That is if you shoot your deer during a season when outdoor temperatures are around that average. You'll be alright for about a week. Even if the daytime temperature is in the 50s but the nighttime temperature is in the 20s.
Question: How do I hang a deer in my garage?
Answer: You can utilize screw-in-eye bolts and not have a problem. A winch isn't necessary if you have someone to assist you. Simply back the truck in, hook up the legs, and slowly pull forward. Another option is to place a 2×4 across the end of your garage door tracks and hang them from it.
Question: How long should I hang a deer before processing?
Answer:
Before processing your deer, you should let it hang for at least 2 to 4 days. It is recommended to hang deer meat for 14 to 18 days for the finest flavor. The older the deer, the longer the hanging period. Use this as a basic guideline.
Question: Can I eat deer meat right after I kill it?
Answer: Yes, you can eat deer meat right after you kill it. However, you need to thoroughly process it before consuming it. You have to clean it, skin it, cut it, and then consume it or preserve it.
Ending Words
Give yourself a pat on the back if you've made it this far. Now you know exactly how to build a deer hanger for the next hunting season.
Make sure to follow our steps to hang the smallest to the biggest prey you hunt.
However, you may not like the process we mentioned above. Alternatively, you may find it difficult to complete. In that case, you can always bring alterations or seek professional help.
Thank you for your patience and for sticking with us all the way to the end.
Good luck with your hunt!


